US Probe
See US Probe Definition for info about how to define an US probe.
US Probe Troubleshooting
Test 1
In order to verify that the probe setup is correct, try the following:
- Start tracking with at least a US probe.
- Connect to a US scanner and start video streaming
- Go to the Acquisition Workflow Step. You should now see the live video image from the US scanner. A yellow box or shape corresponding to your selected US probe shape should be overlayed on your video image, like in the image below
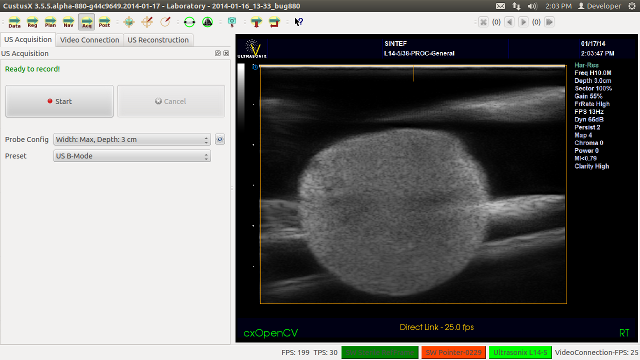
US Acquisition before start. The Ultrasonix L14-5 probe is active and ready to record. The ultrasound area is indicated by a yellow box
If the box is incorrectly positioned, check the following:
- In
US Acquisition Widget, press the Details Button, and inspect the Probe Definition values there.
- In
Video Connection Widget, press the "Import Image from Stream" Button, the inspect the size of the image and verify that it has the correct size, i.e. corresponding to the Probe Definition and to the value set in Probe Calibration Configuration File .
- Solve by correcting the values in the Probe Calibration Configuration File .
Test 2
Full test with US acquisition and 3D US volume reconstruction:
- Prepare the system as earlier, with a US probe connected to a US scanner.
- Add a tool pointer.
- Perform an US acquisition using a US phantom.
- Perform a reconstruction (should be done automatically after an acquisition is complete).
- Use the pointer to inspect the reconstructed US volume. Verify manually that the pointer is in the same correct position as on the physical phantom.
If the comparison fails, check the following:
- The US Probe Definition actually used in the reconstruction can be found in the file Profile Definition {filebase}.probedata.xml . Compare the contents with the ultrasound images.
- The probe calibration sMt might be wrong.
- Check that the tracking sensors are firmly attached to the probe, in exactly the same position as when performing probe calibration. A 1 degree rotation of the sensor can give a 2mm error if the us image is 120mm away from the sensor center.

 1.8.11
