Viewing a volume
Learn how to load a volume and view it in 2D and 3D.
- Get a data set in metaheader (mhd) format. You can use the Kaisa data set for a start. (available along with the installation, or at http://custusx.org/uploads/testdata/). See also Import Overview
- Start CustusX
- Create a new Patient:
File->New Patient or <Ctrl+N>
- Import a data set into the Patient:
File->Import Data or <Ctrl+I>. Browse to your .mhd file and press Open. This opens the Import widget (Import Widget ). Enter correct parameters and press Import. The data set is now available in CustusX.
- Right-click in the 3D View. On the top of the popup menu you should see your imported data set. Select it. The volume will now be displayed in 3D.
- Press the mouse button and move inside the 3D View. The volume rotates. Pressing Shift at the same time translates it.
- Right-click in a 2D View and select the volume anew. The volume will now be displayed in all 2D views.
- Press the mouse button and move inside the 2D view. The yellow cross moves accordingly and let you select where to slice the data.
- Use the scroll wheel to zoom in 2D and 3D.
Changing Volume Properties
Learn how to change the volume colors, window/level etc.
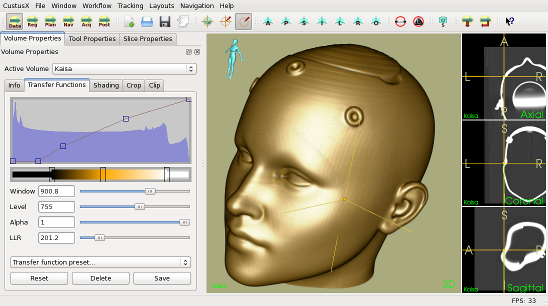
Volume Properties Widget
- Open the Volume Properties Widget. It should be available as a tab to the left of the views. Otherwise, it can be found by right-clicking on an empty spot on the toolbar on the top of the application window. Select
Properties->Volume Properties.
- Open the Transfer Functions tab.
- On the top is the volume histogram, with the opacity transfer function overlayed. Right-click to add point and then drag them to change the function.
- Below the histogram is the color palette bar. The default is black-white. Right-click to add colors, then drag them along the bar.
- The window/level/alpha/llr are shortcuts.
- Window/level defines a window on the intensity range that the colors are clamped onto.
- Alpha/LLR defines a simple opacity transfer function with cutoff (LLR) and height (Alpha).
- When you have played with the colors, save your changes by pressing Save. Your preset is now accessible from the drop-down list.
Changing slice properties
Learn how to change the properties of the 2D slice views.
- Open the Slice Properties Widget. It should be available as a tab to left of the views. Otherwise, it can be found by right-clicking on an empty spot on the toolbar on the top of the application. Select
Properties->Slice Properties.
- Open the Color Tab.
- On the top is the volume histogram, with the opacity transfer function overlayed. The opacity is not relevant if you have only a single volume in a view
- Below the histogram is the color palette bar. The default is black-white. Right-click to add colors. Then drag them along the bar.
- The window/level sliders are normally used on 2D slices. The define a window that clamps the color palette. Set them to values that enhance the information in the slice.
- The values can be saved the same way as in the 3D case.
More on navigation
A few tricks that is nice to know when navigating in volumes:
- The yellow cross visible in the Views are a virtual navigation tool, called the Manual Tool. It defines your focus point, and is controlled by the mouse.
- If you get lost, use the
Center Image button to reset the Tool to the center of the volume.

Center Image Button
- The right-click menus give a few display options. Try them out.
- The
3D->Right-Click->Show Slice Planes are useful to see where the 2D views are positioned in the 3D View, as shown in the figure below
- In the Volume Properties Widget, you can use the Crop and Clip tools to manipulate the 3D volume.
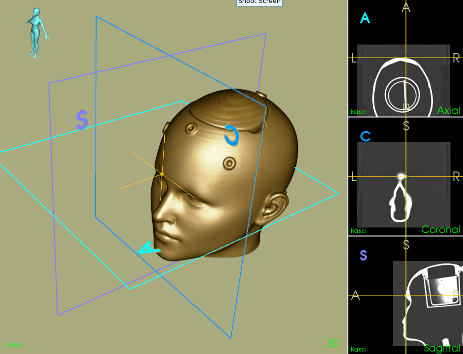
The 2D ACS slice planes to the right are indicated by lines in the 3D View

 1.8.11
